ISAAC O3 Multi-sensor Quick Start Guide
Congratulations on your new O3 Multi-Sensor! This Quick Start Guide will help you with device installation and setup.
O3 Multi-Sensor1. Requirements
- The O3 requires a 24 VDC power supply which is not included. For power and I/O wiring, we recommend using 22–14 AWG 2-conductor copper wire.
- For network cabling, use Cat5e or Cat6 cables.
- Earth ground all devices in the same circuit at the power supply.
2. Selecting a location
- The device should be mounted 2.4 to 4.6 m (8 to 15 ft) off the floor.
- For best performance, place the device in center of the room. Try to keep it at least 2.1 m (7 ft) away from windows or exterior walls.
- Choose a location where the motion sensor view is not obstructed by light fixtures, shelves, etc.
- Do not mount the device next to hot or cold sources.
- Keep the device at least 1.3 m (4 ft) away from ceiling diffusers and other sources of airflow.
Cautions & Warnings
- This product is an electrostatically sensitive device. Proper ESD protection such as a ground strap should be used when installing this product so that damage to the product does not occur.
- Equipment damage or loss of data may occur if these procedures are not followed as specified.
3. Mounting the O3
- If you are mounting directly to the ceiling, cut a hole 32 mm (1¼ in.) in diameter and pull the wires through the hole.
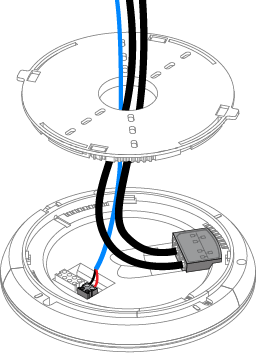
- Pull the wires through the hole in the backplate.
- Mount the backplate to the mounting surface using M4 (#8) screws.
- Connect the power wires, I/O wiring (if present), and Ethernet cable(s).
- Attach the O3 to the backplate. Line up the tabs on the O3 with the notches on the backplate, hold the O3 firmly against the backplate, then twist clockwise.
- Turn on power to the O3. The light ring first plays a blue swirl pattern, then is divided into three segments (blue-red-yellow) as the device runs a power-on self-test (POST). The POST status displays next. Each segment will turn green once it passes its check. If its color remains, then that subsystem did not pass. Blue indicates a Bluetooth issue; red indicates a sensor issue; and yellow indicates a network connection issue.
4. Daisy Chaining (optional)
- Up to 30 devices can be daisy-chained using the ETH2 port. When all devices are powered, cable lengths of up to 100 m (330 ft) between devices are supported.
- The devices have a bypass switch that allows them to continue relaying data after losing power. In a power failure scenario, the maximum cable length is reduced by 15 m (50 ft) for each bypassed device. For example, in the diagram above, if #2 and #3 lose power, #4 can continue to receive data from #1 as long as the total cable length between them (A + B + C) does not exceed 70 m (230 ft).

5. Provisioning using Proviso
- Open the Proviso app and select Bluetooth for your connectivity method.
- Configure a network connection: IP, Ethernet, or Secure Connect. Note: You cannot enable Ethernet or IP at the same time, but you can enable Secure Connect as a second port. The O3 will not route between interfaces, e.g. you cannot route SC to Ethernet, SC to IP, etc.
- To connect BACnet UDP/IP, next to BACnet UDP/IP, select enable Network, then enter the default UDP port number to activate the IP protocol. Select Save.
- To connect BACnet Ethernet, next to BACnet ethernet, select enable Network to activate the Ethernet protocol. Select Save.
- To connect BACnet Secure Connect, next to BACnet SC, select enable Network, then enter the Auto config URL from your enteliWEB site. Select Save.
- To connect MQTT, next to MQTT (Internal), select Enable MQTT Broker. Select Save.
- In the lower right corner of the screen, select Connect. Nearby O3 devices are listed by their Bluetooth MAC address.
- Select an O3 to initiate a connection. The selected O3 plays a sound and the light ring flashes blue.
- If this is the correct device, select Yes, connect. Data loads from the O3 and the status changes to Connected. You can now view device information and sensor data from the O3 in the Diagnostics tab. This data is transferred securely over Bluetooth from the O3 to your mobile device.

6. Configuring the Network
- After connecting to the O3, go to Settings > Network. If you want to assign a static IP address, select Static, enter the IP settings, then select Save. Otherwise, leave it as DHCP. The IP address must be unique for each O3.
- Next to BACnet, select the protocol you want to use (BACnet/Ethernet or BACnet/IP), enter the BACnet settings, then select Save. The BACnet Device ID must be unique for each O3.
- Next to MQTT (Internal), select Enable MQTT Broker, then select Save. Note: ISAAC uses MQTT to monitor the O3, therefore this option must be enabled.
- Next to Security, select , enter a 6-digit PIN to secure BLE read/write access to the hub, then select Save. Note: If you have migrated from the the O3 Setup App, you must use this same pin to access the hub in Proviso.
- Select Apply settings to device. After the settings are applied, the status shows Configured and a green check mark appears next to each applied setting.
7. Calibrating the Sensors
- After connecting to the O3, go to Settings > Calibration and select the edit button.
- Measure the temperature below the O3 at occupant height, enter the temperature in the Actual temperature field, then select Save.
- If you plan to use the O3 for lighting control, adjust the lighting in the space to the desired brightness, record the current reading in the Hub reading at desired light level field, then select Save. This setpoint will be used by the control system as a baseline for control loops.
- Select Apply settings to device.
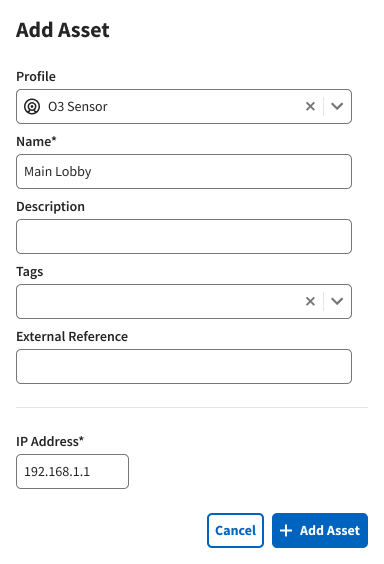
8. Adding to ISAAC Workspace
- Navigate to System > Infrastructure
- Click on + Add Asset
- Give the O3 a unique name and enter its IP Address. You can optionally add other information like a description, tag, or external reference.
- Turn on power to the O3. The light ring first plays a blue swirl pattern, then is divided into three segments (blue-red-yellow) as the device runs a power-on self-test (POST). The POST status displays next. Each segment will turn green once it passes its check. If its color remains, then that subsystem did not pass. Blue indicates a Bluetooth issue; red indicates a sensor issue; and yellow indicates a network connection issue.